1.What LX Draft is
LX Draft is a WYSIWYG word processor built on markdown. You write and format your document on a clean, continuous editing canvas, and the artifact you ship is a polished, branded PDF. Think of it as "Word, but markdown-based, and tuned to produce beautiful print-ready documents."
Because the underlying content is markdown, LX Draft is designed to work well with AI agents. An agent can author a precise, well-structured document — a specification, a proposal, a report — in markdown, and a human can then refine it in the editor. Throughout, the PDF is the deliverable: the thing you send to a client, attach to a project, or file as a record.
Writing LX Draft documents with an AI agent back to top ↑
Because LX Draft documents are markdown under the hood, they are often authored by an
AI agent. You hand the agent a short writing guide, describe the document you need, and the
agent produces a structured .lx.md (or markdown) file you import here. The guide covers the
frontmatter schema, LX-specific extensions (callouts, CSV tables, equations, fields, signatures), how to
deliver embedded images as a bundle, and the validation rules your output must pass.
Agents that write into the open document
Beyond producing a whole file for you to import, an AI agent can now write directly into the document you currently have open. When you ask an agent (for example, through the AI assistance panel) to draft a section, expand a paragraph, or revise wording, it can insert that material at your cursor or replace the body under a specific heading — without you copying and pasting anything.
By default, everything an agent writes comes in as a tracked change you review — a suggestion you can accept or reject (see Tracked changes & reviewing suggestions below). This is the safe default: the agent proposes, you decide. If you explicitly ask the agent to write it in directly (for example, "just insert this, don't track it"), the agent can instead write straight into the document with no review markers. Either way the document is marked unsaved, so your save is always the final checkpoint.
Tracked changes & reviewing suggestions back to top ↑
LX Draft has a Word-style tracked-changes mode (also called suggesting mode). When it's on, edits aren't applied silently — they're recorded as suggestions you can review, accept, or reject. This is how an AI agent proposes changes to a document, and it's equally useful for a person marking up a colleague's draft: someone can make edits that are clearly visible and can be absorbed into the final document or rejected, without anyone having to re-read the whole thing to find what changed.
Turning it on
Open the Review panel and use the Track Changes toggle. While it's on, your typing and deletions become suggestions; while it's off, you edit the document normally. You can switch it on and off freely as you work — text you type with tracking off is plain document content, and text you type with it on is a suggestion. (An AI agent's insertions are tracked by default regardless of your toggle, unless you asked the agent to write directly.)
What suggestions look like
- Insertions — newly added text is shown underlined / in the suggestion colour (green). It isn't really "in" the document until you accept it.
- Deletions — when you delete existing committed text, it isn't removed; it's shown with a red strike-through and kept until you accept the deletion. Deleting text that was itself only a not-yet-accepted insertion simply removes it (there's nothing committed to strike through).
The review pane
Each suggestion appears as a card in the Review panel, showing who made it, when, the kind of change (insert / delete / replace), and a preview of the text. Long suggestions are trimmed with an ellipsis — click the card to jump to that change in the document and highlight it. Click the same card again to clear the highlight; clicking elsewhere in the document also clears it.
Each pending card has Accept and Reject buttons:
- Accept an insertion → the new text becomes permanent document content.
- Reject an insertion → the new text is dropped.
- Accept a deletion → the struck-through text is removed for good.
- Reject a deletion → the struck-through text is restored.
Accepting or rejecting applies to the document immediately and is a single step you can undo with Ctrl+Z. Resolving one suggestion never disturbs the others.
Getting your document reviewed by colleagues back to top ↑
The previous section is about reviewing suggestions in your own copy. A review round is the multi-person version: you send colleagues a link, they leave comments and suggested edits, and when you're done you pull the whole lot back into your document and accept or reject each one. It replaces the "email the draft round and merge six replies by hand" routine.
The important thing to understand is that reviewers are deliberately limited. They can comment and suggest. They cannot edit your text directly, cannot accept or reject anything, and cannot touch document properties. Only you resolve suggestions, and only after you've ended the round. That's what makes it safe to hand the link to several people at once.
Starting a round (the document owner)
- With your document open, click 📝 Request review… in the toolbar.
- The dialog gives you a Reviewer link. Copy it and send it to your colleagues — email, Taut, however you like. The same link works for everyone.
- As comments and suggestions arrive they appear in your editor automatically, within a few seconds. You don't need to reload.
- You can reply to any comment while the round is open, so a question doesn't have to wait for the round to close.
- When you've had enough feedback, click End review. The round closes, the merged result opens in your normal editor, and every suggestion becomes an ordinary tracked change.
- Work through them with Accept / Reject exactly as described in the section above, then Save back to disk or Drive as usual.
Re-opening the Request review… dialog on a document that already has a round running shows you the existing link, when it expires, and lets you cancel the round. If you lose track of a link — cleared your browser, switched machine — your rounds are still findable; they're tied to your account, not to the browser you started them in.
Leaving feedback (the reviewer)
- Open the link. Sign in with Taut — a review round is an internal-colleagues surface, not a public link, so a session is required and your name is taken from your Taut profile (you can't post under someone else's name).
- Select the text you want to talk about. A small popover appears offering 💬 Comment and ✏️ Suggest change.
- 💬 Comment — type what you want to say and Submit. The passage is highlighted and your remark is attached to it.
- ✏️ Suggest change — you'll see Replace: (the text you selected) and With: (your new wording). Submit, and the owner sees it as a tracked change they can accept in one click. Leave the "With" box empty to suggest deleting the selected text.
- You can also reply to comments already on the document, so a round can hold an actual conversation.
Everyone's suggestions appear in their own colour, so in a round with several reviewers you can see at a glance who proposed what — in the document and on the cards in the Review panel.
When a selection is refused
Occasionally a comment or suggestion is declined with a short explanation. This is deliberate, not a glitch — the round protects the structure of the document:
- "That selection crosses an existing comment or suggestion" — your selection half-overlaps someone else's. Select a clean range, or comment on their suggestion instead.
- "That text is inside a pending suggestion" — you're editing someone else's not-yet-resolved proposal. Comment on it rather than amending it.
- "That selection includes a field, image or equation" — these are single indivisible objects. Select around them.
- "Review text is plain text" — comments and suggestions are plain prose. Document structure (fields, cross-references, images, footnotes, equations) can't be introduced through a suggestion; describe what you want in a comment instead.
- "The document changed — refresh and try again" — the passage moved under you. Reload and reselect.
2.Two ways to use LX Draft (Standalone vs Lexis) back to top ↑
This is the most important concept to understand. LX Draft runs in two modes, and a document always knows which mode it belongs to.
Standalone
You open LX Draft directly in your browser and work on a document on your own. Documents are plain
.lx.md files that you open and save on your own computer. There is no project
governance: you decide when the document is finished, and you self-sign it on an
honour-system basis. This is the "Word, but markdown-based, producing beautiful PDFs" experience.
Lexis-managed
LX Draft can also be launched from Lexis, the project-management suite. In this mode the document is a controlled project artifact. Its lifecycle — releases, version history, and signing — is owned by Lexis, and the document's content lives in the project's Google Drive folder rather than on your computer.
Where your documents live & letting an agent edit them back to top ↑
Your document is markdown under the hood and the thing you ship is the PDF — but the editable document itself has to live somewhere. LX Draft gives it one of three homes, and it helps to know what each means before you start. (If you just want "which one do I pick for my situation," skip to the scenarios below.)
The three homes
| Home | What it is | Good for |
|---|---|---|
| Your computer | A plain .lx.md file on your own disk. The file on disk is the master copy. |
Working on your own; keeping everything local; no cloud involved. |
| Google Drive | A file in your Google Drive. The Drive file is the master copy; you open and save it straight from LX Draft. | Backup, opening it from any device, letting colleagues have the file. |
| A shared link | A link you hand to someone else. It can be read-only (they view it in a browser) or a read-write "agent link" that lets an AI agent edit the document while you have it open. | Sending a read-only copy; letting an outside AI agent edit your open document. |
The desktop app
The desktop app is the same LX Draft in its own window. A Google Drive document opens there exactly as it does in the browser — same document, same link. A document that lives on your computer stays on your computer: the desktop app reads it from your disk and saves it back to your disk. Opening a local file does not upload it anywhere — nothing leaves your machine unless you deliberately create a shared link for it.
Letting an agent edit your document
There are two kinds of agent that can edit the document you have open, and both show their work as tracked changes you review (see Tracked changes):
- The in-app assistant — the AI panel built into LX Draft. It edits whatever document you have open, with zero setup. This is covered in Writing LX Draft documents with an AI agent above.
- An outside agent (for example Claude Code in a terminal) — you generate an agent link for the document and hand it to the agent. The agent connects and edits the document you have open, live, while you watch — again as tracked changes you accept or reject. Your Save then writes the result back to wherever the document lives (your disk or your Drive).
On the desktop app there is also a fully-local option: a coding agent running on the same computer can connect straight to the desktop app (no link, nothing sent to any server) and edit the local file you have open. See the scenarios for when to use which.
Which home should I use? — scenarios & steps back to top ↑
Pick the row that matches what you're trying to do, then follow the steps for it.
| Your situation | Use… | Why |
|---|---|---|
| "It's just me, on my own machine." | A file on your computer | Nothing leaves your machine; simplest possible setup. |
| "I want it backed up, or to open it from another device, or to hand the file to a colleague." | Google Drive | The master copy lives in your Drive; open it anywhere; Drive handles backup and access. |
| "I want to send someone a copy just to read." | A read-only share link | They open it in a browser — no install, no login — and can "Save a copy" if they want to keep it. |
| "I want an outside AI agent (like Claude Code) to edit this while I watch." | An agent link | The agent edits your open document as tracked changes; you review and save. |
| "I want a local coding agent to edit my local file, with nothing on any server." | The desktop app's built-in agent connection | Agent and file both stay on your machine — no link, no cloud copy. |
Work on your own machine
- Home screen → + New Blank (or Open… → the Local tab to open an existing file).
- Write and format your document.
- Save (Ctrl+S). In Chrome/Edge or the desktop app this writes straight back to the file in place; in Firefox/Safari it downloads a fresh copy each time (a browser limit).
Put it on Google Drive
- Save As → the Google Drive tab (the first time, connect your Google account when prompted).
- Pick a Drive folder. The document is written there as an
.lx.mdfile. - Later, open it from the Open… dialog's Google Drive tab (or your Recent files) — Drive recents re-open in one click. Every Save goes back to the same Drive file.
Send a read-only copy
- With the document open, choose Share.
- Create link, pick who can open it (anyone with the link, or sign-in-required), and Copy the link.
- Send it. The recipient opens it in a browser, read-only; they can Save a copy to keep their own. You can change who can open it, extend it, or Revoke it any time from the same dialog.
Let an outside AI agent edit it
- Open the document you want the agent to work on (make sure it stays open — the agent can only edit an open document).
- Choose Let an agent edit… and Create agent link.
- Copy the one-line setup command it shows (a
claude mcp add …line) and run it in your agent, e.g. Claude Code. The agent is now connected to this open document. - Ask the agent to make its edits. They appear in your document as tracked changes — accept or reject them in the Review pane.
- Save to write the result back to your file (on disk or in Drive).
- When you're finished, Revoke the link (the dialog also lists every agent link you've created, so you can find and revoke one later even from a different browser).
Let a local agent edit a local file (desktop app)
- Open the local document in the desktop app.
- Open Settings and copy the desktop app's
claude mcp addline (this points at the app on your own machine —127.0.0.1— so nothing goes to any server). This is a one-time setup. - Run it in your coding agent, then ask it to edit. It drives the open document directly over your machine; edits arrive as tracked changes and your Save writes to the local file. No link is created and no copy is stored anywhere online.
3.Creating, opening & saving documents back to top ↑
Starting a document
The home screen has four buttons across the top:
- + New Blank — start from an empty document.
- Open… — open an existing
.lx.mdor.mdfile. The dialog has Local and Google Drive tabs, so you can open from your computer or from your Drive in one place. - Import Markdown — bring in existing markdown content as a new document (supports
.mdfiles and bundled markdown + images). - From Template ▾ — start from a pre-built, branded template.
Opening a plain markdown file
If you open a plain .md, .markdown or .txt file (anything without
LX Draft's frontmatter), LX Draft offers three choices:
- Convert to LX Draft — wraps the content as an
.lx.mdand opens Document Properties seeded with sensible defaults (title from filename, today's date, draft status). - View only — opens the file with a yellow banner; the editor is read-only and signing is hidden, but Export still works.
- Cancel — same as View only (with the banner offering a one-click Convert).
Files that aren't markdown — .gdoc, .docx, .pdf, images —
show a friendly dialog explaining what to do instead, rather than opening into a blank editor.
Saving locally
Use Save (or press Ctrl+S) to write the .lx.md back
to wherever the document came from. Save As opens a tabbed dialog where you choose the
destination:
- Local drive — In Chrome and Edge, saving writes back to the same file in place — just like a desktop app. In Firefox and Safari, each save downloads a fresh copy rather than overwriting the original (a browser limitation).
- Google Drive — choose a folder via the Drive picker; the document is written into that folder and subsequent saves go back to the same Drive file.
Saving to Google Drive
The first time you use Save As → Google Drive in a session, LX Draft prompts you to connect your
Google account. After that, the Drive folder picker opens directly. The document is stored as a
standard .lx.md file in the folder you choose; you can edit it directly in LX Draft any
time you open it from Drive, and your other Drive collaborators see the file (though they'll need
LX Draft to render it).
Recent files
LX Draft keeps a Recent files list so you can jump back into recent work.
- Google Drive recents open silently — one click and you're back in the document.
- Local recents need a quick re-pick: for your security, the browser does not let a web app silently re-open a file from disk, so a file picker confirms which file each time.
4.Document properties & fields back to top ↑
Every document has a set of properties (stored as front-matter), edited in the Properties panel: title, document number, revision, author, status, classification, and similar metadata.
Insert Field
The Insert Field feature drops a live document-property token into the body of your document — for example, the document number. The token displays the property's current value and updates automatically if you change that property. When you export, the field resolves to its value, so the PDF shows the real number rather than a placeholder. This keeps references like "Document {document-number}, Rev {revision}" always in sync with the properties.
5.Document signing back to top ↑
Standalone signing
Click Sign, type your name, and LX Draft records the signature in the document along with the date. Where a signature field is placed, the signature renders in a cursive font, for example:
Alex Morgan
Lexis-managed signing
For Lexis-controlled documents, signing uses your authenticated Lexis identity rather than a typed name. The release/version lifecycle in Lexis controls when signatures are locked and when they are cleared, so signing is tied to the formal project record rather than the honour system.
6.Version history & releases (with Lexis) back to top ↑
Standalone
In standalone mode the revision history is a table you maintain by hand. Each entry has a class describing its stage:
| Class | Meaning |
|---|---|
| Draft | Work in progress. |
| Review | Submitted for review. |
| Approved | Reviewed and approved. |
| Released | Formally issued. |
| Obsolete | Superseded; no longer current. |
Lexis-managed
In Lexis mode the version history reflects actual releases recorded by Lexis — Lexis is the authoritative ledger. Creating a new version in Lexis strips the signing, bumps the revision, and unlocks editing so the next round of work can begin cleanly. You don't maintain the table by hand; it mirrors the real release record.
7.The integrity hash back to top ↑
Every saved document carries a content hash — a fingerprint computed from its contents. This hash underpins two things:
- Tamper detection — if the content no longer matches the recorded hash, LX Draft can tell the document has changed.
- Auto-clearing signatures on edit — because any edit changes the content (and therefore the hash), LX Draft knows the signed text is no longer intact and clears the signature (see section 5).
8.Pagination, PDF generation, footnotes & endnotes back to top ↑
One continuous flow while editing
While you edit, the document is a single continuous flow — there are no page boundaries in the editor. This is deliberate: it keeps writing and editing fluid, without text jumping around page breaks as you type.
Pages appear at PDF time
Pagination happens at PDF-generation time. The export engine (PagedJS) flows your content into pages and applies the print furniture:
- A cover page.
- Headers and footers with live page numbers.
- Watermarks on each page (where configured).
Footnotes
In the editor, footnotes are collected at the end of the document so they are easy to read and edit in one place. During PDF pagination, each footnote floats to the bottom of the page where its reference appears — proper paged-media footnotes. The reference itself renders as a superscript number in the body text.
Endnotes
Endnotes are different from footnotes: they are collected together at the very end of the document in the PDF, rather than per page.
9.Headers, footers & the cover page back to top ↑
Open the Document Properties panel (the right-hand panel) and use the Page tab for headers/footers and the Properties tab for the cover page. These appear in the exported PDF (and Print Preview) — the editing canvas itself stays clean. A live preview of the header and footer is shown at the very end of the document while you edit.
The cover page
Tick Cover page at the top of the Properties tab to add the branded LX cover — a full-bleed title page built from your document fields (title, document number, revision, project, author, date). It only renders in the PDF, as the first page. For full control you can paste your own HTML into Cover HTML (which replaces the built-in cover).
Headers & footers
The Page tab gives each of the header and footer two layers that stack:
- Field-code text — small text in the page margins. The header has Left/Right; the footer
has Left/Center/Right. Type plain text, or use field codes in curly braces that fill in
automatically:
{title},{revision},{document_number},{date:MMM YYYY}, and — for the footer —{page}and{pages}for live page numbers (e.g.Page {page} of {pages}). - A branded HTML band (optional) — a full-width coloured bar behind the text. See below.
Show header / Show footer checkboxes turn each on or off (they're on by default). Turning one off hides it from the PDF but keeps your text, so you can switch it back on later. If you leave a field blank, a sensible default fills in; to force a field truly empty (so it doesn't show), clear it — the empty value sticks.
The Watermark (the big diagonal "COMMERCIAL IN CONFIDENCE" across every page) is controlled by the document's Classification field — set it to commercial-in-confidence or restricted and the watermark appears automatically, sized to fit the page.
Branded header / footer bands (custom HTML)
For a branded bar like the blue LX header, paste HTML into the Header HTML (or Footer HTML) field on the Page tab. It renders as a full-width band on every content page; the field-code text (including live page numbers) layers on top. For example, this produces the blue gradient header:
<div style="height:16mm;background:linear-gradient(90deg,#2ba0e8,#4ab4f5);
            color:#fff;display:flex;align-items:center;justify-content:space-between;
            padding:0 20mm;box-sizing:border-box;font-weight:700;">
  <span>{title}</span><span style="font-weight:400;">{date:MMM YYYY}</span>
</div>
It renders like this on every page:
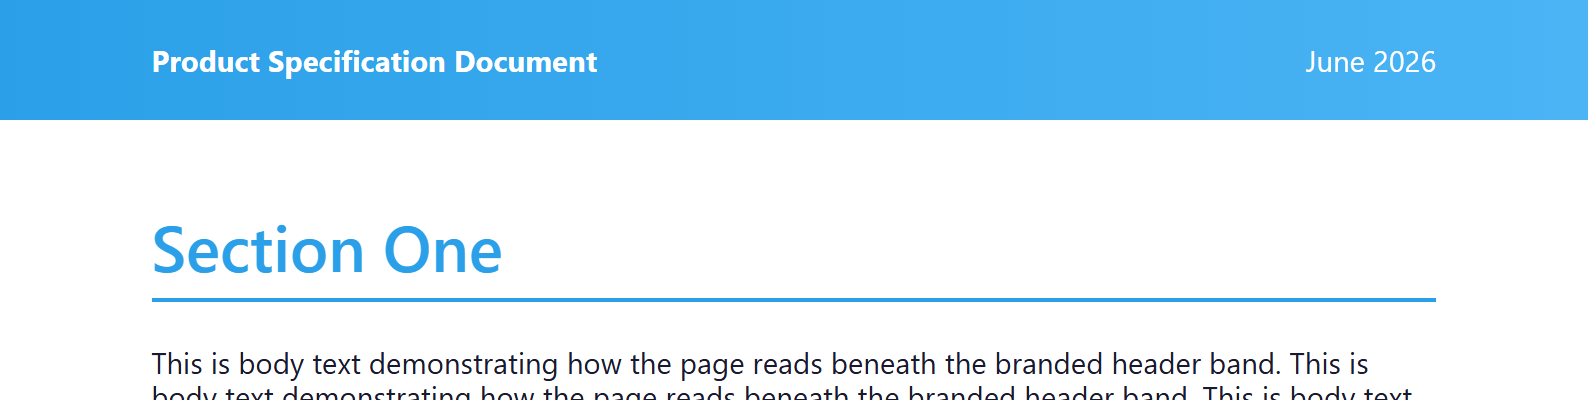
header_html band: full page width, the title left and date right.Two things worth knowing:
- Keep the band shorter than the page margin. The band sits in the page's top (or bottom) margin, so its height must be less than that margin (default 25 mm). If you want a 16 mm band, make sure the top margin is at least ~20 mm — the panel warns you if the band is too tall to appear.
- Page numbers go in the footer fields, not the HTML. Inside a custom band,
{title}and{date:…}work, but{page}/{pages}don't — keep those in the footer's Left/Center/Right fields, which paint on top of the band.
Tip: if you don't know HTML, ask the Lexi panel to generate a header band for you — it knows the recipe and can paste ready-made HTML into the field.
Diagrams — Mermaid & SVG back to top ↑
You can put diagrams inside the document itself — they travel with the
.lx.md, so there are no separate image files to keep track of. There are two
kinds, and — importantly — they are edited in completely different ways, so it's
worth knowing which one you have.
| Mermaid | SVG | |
|---|---|---|
| What it is | A text description of a diagram (flowchart, sequence diagram, timeline…) that LX Draft renders for you. | An actual drawing — shapes, arrows and text laid out on a canvas. |
| Written as | A mermaid code block. |
An svg code block. |
| How you edit it | Edit the text (there is no graphical editor — see below). | Edit graphically — a real drawing editor. |
| Best for | Quick, clean structural diagrams — and the easiest thing to ask an AI agent for. | Precise or detailed illustrations you want to fine-tune by hand. |
Editing a Mermaid diagram
A Mermaid diagram is its text, so you change it by changing that text. Expand the diagram block (its collapse/expand toggle) to reveal the Mermaid source, edit it, and the picture re-renders live. Or simply ask the AI agent to adjust the diagram for you.
There is no drag-the-boxes editor for Mermaid, and that's fundamental rather than a missing feature. In Mermaid you describe relationships ("A leads to B") and a layout engine works out where everything goes — you never state positions yourself. There's nowhere in the text to record "this box, moved here," so a graphical nudge would have nowhere to be saved and the next render would undo it.
Editing an SVG diagram (“Edit graphically”)
On an SVG diagram, click Edit graphically to open the built-in drawing editor. Move and add shapes, arrows and text, recolour things, lay it out visually. When you're done, Save in the editor writes the drawing straight back into the document (its size and any rotation are preserved) — a lightweight drawing tool living right inside your document.
10.Exporting back to top ↑
LX Draft can export your document to several formats:
- PDF — the primary deliverable; the polished, paginated output.
- DOCX — a Word document (this option requires the server to have pandoc installed).
- HTML — a web version of the document.
- Markdown — the plain markdown source.
In every export, document-field and signature tokens resolve to their values, so the output shows the real document number, revision, signature, and so on — not the placeholder tokens.
11.Tips & keyboard shortcuts back to top ↑
- Ctrl+S — save the document.
- Ctrl+Z / Ctrl+Y — undo / redo. These always act on the document editor, and undo steps back through accept/reject of tracked changes too.
- Turn Track Changes on or off from the Review panel to switch between suggesting edits and editing the document directly (see Tracked changes & reviewing suggestions).
- The toolbar is organised into groups: Text, Paragraph, Insert, and References.
- The left Panel widget has tabs for Map (document outline), Properties, History, and Signing.
- For in-place saving on local disk, use Chrome or Edge (see section 3).
- Use Insert Field for anything that should track a document property automatically (see section 4).
- Save as Template in the editor turns the current document into a reusable template, available from the home screen's From Template ▾ dropdown for future documents.